How to Screen Record With Audio on Mac: Step-by-Step Guide
How to Screen Record With Audio on Mac
You have two built-in options for recording your screen with audio on a Mac: QuickTime Player and the Screenshot Toolbar.
Using QuickTime Player:
- Open QuickTime Player.
- Go to the File menu and select New Screen Recording.
- Click the down arrow next to the record button to choose your microphone (built-in or external).
- You can choose to record the entire screen or a selected portion:
- Click anywhere on the screen to record the whole screen.
- Drag your cursor to select a specific area for recording.
- Click the Record button to begin recording.
- To stop recording, click the stop button in the menu bar or press Command + Control + Escape.
Using Screenshot Toolbar:
- Press Shift + Command + 5 to open the Screenshot toolbar.
- In the toolbar, under the recording options, choose either Record Entire Screen or Record Selected Portion.
- Click the Options button to select your microphone and other recording preferences (location, timer, etc.).
- Click Record to start capturing your screen.
- Press Command + Control + Escape to stop recording. Read about Does Steam Work on Mac

After recording with either method, QuickTime Player will automatically open your screen recording. You can then trim, edit, or save the recording as needed.
Understanding the Built-in Tools on Mac
QuickTime Player
QuickTime Player is a versatile media player that comes pre-installed on all Macs. It’s not just for watching videos; it’s also a powerful screen recording tool.
Benefits of Using QuickTime Player
- Free and Pre-installed: No need to download extra software.
- User-Friendly Interface: Easy to navigate even for beginners.
- Basic Editing Features: Trim your recordings without needing another app.
macOS Screenshot Toolbar
The macOS Screenshot Toolbar, introduced in macOS Mojave, offers another convenient way to record your screen with audio.
Benefits of Using Screenshot Toolbar
- Quick Access: Easily accessible with a keyboard shortcut.
- Integrated Tool: Works seamlessly with other macOS features.
- Simple to Use: No complicated settings to configure. Don’t Miss to Check Out Our Website: THENATION ALLENS
How to Screen Record with QuickTime Player
Step-by-Step Guide
- Open QuickTime Player from your Applications folder.
- Click on “File” in the menu bar and select “New Screen Recording”.
- Click the record button in the screen recording window.
- To record the entire screen, click anywhere on the screen. To record a portion, drag to select the area and click “Start Recording”.
Recording Screen with Internal Audio
To capture internal audio, you’ll need an additional utility like Soundflower or BlackHole to route the system audio to QuickTime.
- Install Soundflower or BlackHole.
- Open “Audio MIDI Setup” and create a Multi-Output Device.
- Select the Multi-Output Device as the output in System Preferences.
- In QuickTime, choose the Multi-Output Device as the audio input.
Recording Screen with External Audio
- Connect your external microphone.
- In the screen recording window, click the drop-down arrow next to the record button.
- Select your microphone from the list.
- Follow the usual recording steps.
How to Screen Record with macOS Screenshot Toolbar
Step-by-Step Guide
- Press Command + Shift + 5 to open the Screenshot Toolbar.
- Choose between recording the entire screen or a selected portion.
- Click on “Options” to select your audio source.
- Click “Record” to start recording.
Recording Screen with Internal Audio
Similar to QuickTime, use Soundflower or BlackHole to route the system audio to the Screenshot Toolbar.
- Set up Soundflower or BlackHole.
- Choose the appropriate audio source in the Screenshot Toolbar options.
- Start your recording.
Recording Screen with External Audio
- Connect your external microphone.
- In the Screenshot Toolbar options, select your microphone.
- Begin recording.
Using Third-Party Applications
Benefits of Third-Party Apps
- Advanced Features: More control over audio and video settings.
- Better Integration: Often includes built-in editing tools.
- Higher Quality: Generally provides higher quality recordings.
Top Third-Party Apps for Screen Recording with Audio
OBS Studio
- Free and Open Source: Widely used in the streaming community.
- Highly Customizable: Extensive settings for audio and video.
- Cross-Platform: Available on macOS, Windows, and Linux.
ScreenFlow
- Professional Editing Tools: Includes advanced editing features.
- High Quality: Excellent for professional recordings.
- Easy to Use: Intuitive interface.
Camtasia
- All-in-One Solution: Screen recording and video editing.
- Interactive Elements: Add quizzes and other interactive elements.
- Reliable: Well-known for stability and performance.
How to Screen Record with OBS Studio
Step-by-Step Guide
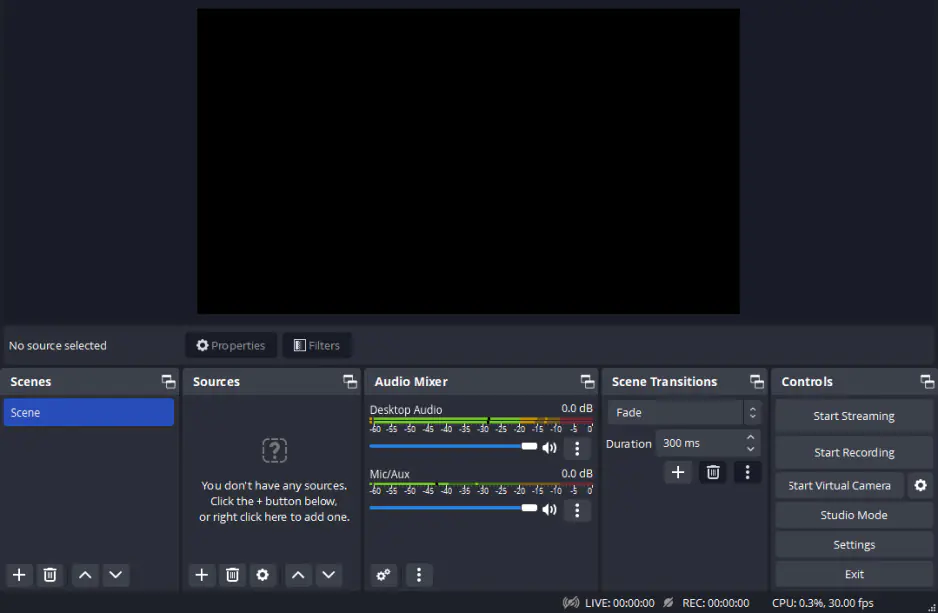
- Download and install OBS Studio.
- Open OBS and go to Settings.
- Set up your audio devices under the “Audio” tab.
- Add a “Display Capture” source for video.
- Click “Start Recording” to begin.
Recording Screen with Internal Audio
- Use Soundflower or BlackHole to route system audio.
- Select the virtual audio device as your audio input in OBS.
- Start recording.
Recording Screen with External Audio
- Connect your external microphone.
- Select your microphone as the audio input in OBS.
- Begin your recording.
How to Screen Record with ScreenFlow
Step-by-Step Guide
- Download and install ScreenFlow.
- Open ScreenFlow and create a new recording.
- Choose your screen and audio sources.
- Click “Record” to start.
Recording Screen with Internal Audio
- Install ScreenFlow’s additional audio driver.
- Select the internal audio option in ScreenFlow.
- Start recording.
Recording Screen with External Audio
- Connect your external microphone.
- Select your microphone as the audio source in ScreenFlow.
- Begin recording.
How to Screen Record with Camtasia
Step-by-Step Guide
- Download and install Camtasia.
- Open Camtasia and start a new recording.
- Select your screen and audio sources.
- Click “Start Recording”.
Recording Screen with Internal Audio
- Use Camtasia’s audio driver for system audio capture.
- Select the internal audio option in Camtasia.
- Start recording.
Recording Screen with External Audio
- Connect your external microphone.
- Select your microphone in Camtasia.
- Begin recording.
Tips for High-Quality Screen Recording
Choosing the Right Audio Source
Ensure you select the best audio input to avoid poor quality.
Adjusting Audio Levels
Balance audio levels to prevent distortion or inaudible sound.
Ensuring Clear Video Quality
Record in high resolution and use good lighting for clarity.
Troubleshooting Common Issues
Audio Sync Problems
Ensure your audio and video sources are correctly synchronized.
Low Audio Quality
Use a high-quality microphone and adjust settings appropriately.
File Size Management
Compress files without losing quality for easier storage and sharing.
Editing Your Screen Recordings
Basic Editing Tools
Trim, cut, and merge clips with built-in tools.
Advanced Editing Techniques
Use advanced features like keyframing and transitions for a polished look.
Adding Annotations and Effects
Incorporate annotations, text, and visual effects to enhance your recordings.
Saving and Sharing Your Recordings
Best Formats for Saving
Use MP4 or MOV for compatibility and quality.
Sharing on Various Platforms
Directly upload to YouTube, Vimeo, or share via cloud services.
Keeping Your Files Organized
Label and categorize your recordings for easy retrieval.
Conclusion
Screen recording with audio on a Mac can be straightforward with the right tools and techniques. Whether you use built-in options like QuickTime Player and the Screenshot Toolbar or opt for third-party applications, there’s a solution for every need. Experiment with different methods to find what works best for you, and soon, you’ll be creating high-quality screen recordings with ease.
FAQs
Can I record my screen and audio on Mac without any third-party apps?
Yes, you can use QuickTime Player and the macOS Screenshot Toolbar for basic screen recording with audio.
How do I ensure my screen recordings have the best audio quality?
Use a high-quality microphone, adjust audio settings, and ensure a quiet recording environment.
What is the best format for saving screen recordings?
MP4 and MOV are recommended for their balance of quality and compatibility.
Can I edit my screen recordings directly on Mac?
Yes, basic editing can be done with QuickTime Player, and more advanced editing can be achieved with apps like iMovie or third-party software.
Are there any free third-party apps for screen recording with audio?
OBS Studio is a free, powerful option for screen recording with audio on Mac.

Welcome to TheNationalLens.ca, where Benjamin provides a sharp and insightful view into the heart of Canadian news and culture!
Benjamin is a seasoned writer with a deep passion for storytelling and a commitment to uncovering the truths that define our nation. With a focus on in-depth analysis and comprehensive reporting, Benjamin’s work spans a wide array of topics, including politics, economics, social issues, and beyond.

